Set up a Desktop card machine

We’ve made setting up your Barclaycard Desktop card machine as easy as pie.
It takes less than 5 minutes to connect your cables, and only about 15 minutes to do the on-screen setup.
Watch the installation videos
Watch our short guide to setting up your Desktop card machine using a broadband connection.
Viewing time: 02:59.
Watch our short guide to setting up your Desktop card machine using a telephone line.
Viewing time: 03:28.
-
What’s in the box
Your box should contain the following
![]()
A countertop card machine and a customer PIN pad (if you requested one) with a curly black cable![]()
A pink Ethernet cable, a black phone cable and a power lead
![]()
A black junction box (with the phone and Ethernet cables plugged into it), 2 supervisor cards and 1 PIN training card
-
Connect and charge
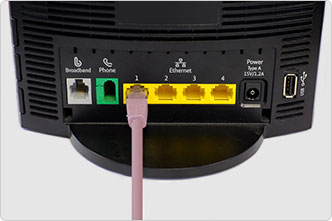
1. Check your cable connections![Barclaycard Desktop card machine and separate PIN pad]()
The cables should all be attached to your card machine when you open the box. It’s good to do a quick check, though.
- If you chose to have a separate PIN machine, check that it is connected to your card machine
- Check that the black junction box is connected to your card machine by a curly black cable
- Check that the phone and Ethernet cables are attached to the junction box
2. Choose how you connect to the internet
You can connect to the internet in any of these 3 ways:
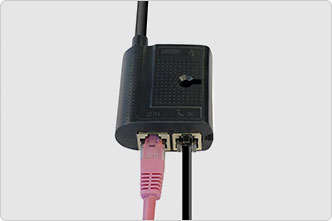
![Junction box with Ethernet and phone cables connected]()
Both phone and broadband
If you want to connect this way, leave both the phone and Ethernet cables connected to the junction box.
Why both?
If the broadband ever goes down, your card machine tries to connect using the phone line after 2 failed transaction attempts.![Junction box with phone cable connected]()
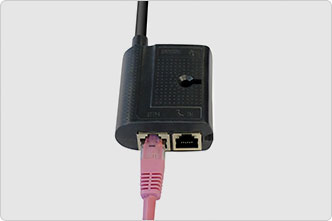
Broadband only
If you want to connect this way, unplug the black phone cable.
![Junction box with phone cable connected]()
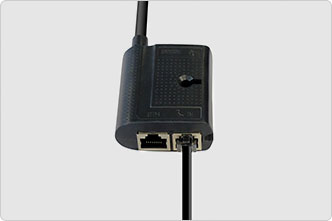
- Phone only
If you want to connect this way, unplug the pink Ethernet cable.
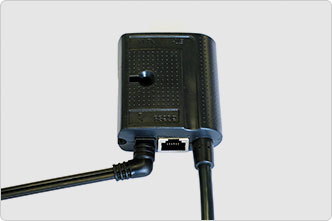
3. Connect the power
![Junction box with power lead connected]()
Connect the power lead to the black junction box using the round socket.
4. Plug the power lead into the mains
![Power lead connected to mains with switch in ON position]()
Remember to turn the power on at the wall.
When you plug in your card machine, it beeps and the screen lights up.
5. Get to know your card machine
![The plug icon]()
You can see a row of icons when the screen is active.
The plug icon shows that your card machine is getting power from the mains
![A green network icon means the unit is connected. A white icon means unconnected. A red icon means there is a problem.]()
The network icon lets you know whether your card machine is connected to broadband![The phone icon is white and horizontal when disconnected, yellow and tilted when connecting, and green and vertical when connected]()
The phone icon lets you know what the phone is doing -
On-screen set up
1. Before you start![]()
If you make a mistake or want to start again, press CANCEL twice to go back to the start of the setup process.
2. Choose how you connect
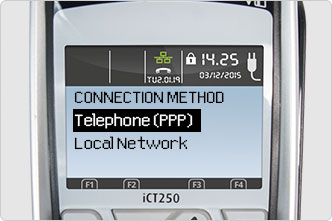
![Choose connection method, phone or broadband]()
Under the screen message CONNECTION METHOD, scroll down with the arrow key to choose one of these options:
A) Telephone (PPP)
If you want to connect using a phone line onlyB) Local Network
If you want to connect using broadband only, or broadband and a phone lineThen press ENTER.
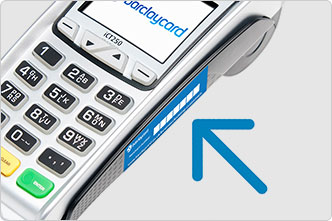
3. Find your merchant number
![Merchant number entered on screen]()
Your 7-digit merchant number is on the blue sticker on the side of your card machine.
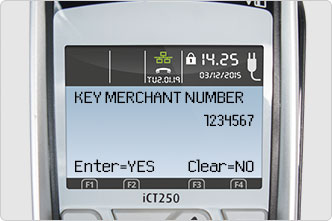
4. Key in your number
![Merchant number entered on screen]()
Key in your merchant number, and press ENTER.
Your card machine then does some setup on its own. It shuts down and restarts, and displays a sequence of different messages during this time. Just wait till it’s done – about 5-10 minutes.
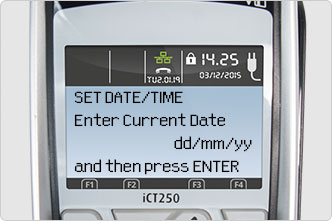
5. Set the date
![Set Date screen message]()
When your card machine is ready for you to continue, it displays:
SET DATE/TIME
Enter Current Date
dd/mm/yyEnter today’s date – 2 digits for the day, then 2 digits for the month, then the 2 last digits of the year.
Key in the date using the keypad, then press ENTER.6. Set the time
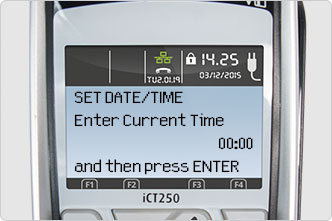
![Authorisation on desktop connecting to Barclaycard]()
Key in the time using the keypad, then press ENTER.
Enter the time, using the 24-hour clock.
7. Check the list
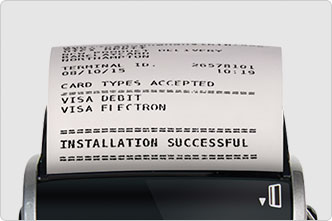
![List of card types accepted]()
Check the list that your card machine prints out. The list shows all of the card types you are able to accept.
If any card types are missing, or if the list displays CARD TYPES NOT ACCEPTED, contact us.
8. The extra step for PIN pads
![Hardware Serial Validation Required screen message]()
If you chose to have a separate PIN pad, your card machine displays Hardware Serial Validation Required. Press ENTER.
Your card machine takes a few minutes to set up the PIN pad.
When the PIN pad setup process is finished, the PIN pad displays Barclaycard Payment Acceptance.
Press ENTER.9. You’re set to start
![When ready to use, Ready and your merchant number are displayed]()
Your card machine displays READY, and your merchant number.
You can now run your test sale.